The Best Trail Camera Strategies For Your Summer!
If you love deer hunting like us, and get excited to see giant velvet bucks, then you probably also love using trail cameras to get awesome pictures of summer deer. It is just a very special thing when you can have stealthy 24/7 survallience of your deer herd. When you start getting those giant velvet bucks on your cameras, it brings great excitement for the upcoming season, and you can gather great information from these deer in the summer. Here are a few of the Best Trail Camera Strategies for Summer!
Before we get into the best trail camera strategies for summer deer, we should go over the advantages and disadvantages of using the best trail camera strategies for summer deer first.
Now is you chance to Join the FeatherNett Elite. Get tons of email exclusives, Hunting products, discounts, and More. Sign Up Below!
Advantages:
- The Enjoyment of being able to see deer in the summer is a blessing. Finding Big Bucks in velvet, and being able to get great trail camera pictures of those deer are great ways to double your excitement for the upcoming season.
- Survey/Inventory the deer around your property. This is more for people that hunt hundreds of acres, to the point you know the deer go through the majority of their seasonal patterns on your property. By inventorying the deer in the summer, you can develop a pre-hitlist. If you know that the deer are living on your property and you notice that the 3-1/2 year old last year that you passed made it through to this year, and now you can add him to you main Hitlist. You will be able to find traveling characteristics for each deer by using the best trail camera strategies for summer down below.
Disadvantages:
- One thing that you need to take note of is that deer patterns vary by season, and the patterns they are on now, won’t be the ones they are on in the fall. Don’t let this information mislead you.
- Too much monitoring could result in deer leaving your property or avoiding you camera sites. It is very easy to educate the deer if you start becoming invasive.
Use the tips and strategies down below to greatly increase you trail camera strategies for summer.
-
Food Plots & Agricultural Fields
Food plots and Agricultural fields are great for the best trail camera strategies for summer, because the bucks and doe, need calories to recover from the stressful winter and so that they can get the nutrients that they need to grow. They need this tonnage so that they can put on body weight and have great antler growth. Having high quality food that is protein rich will serve perfectly for your trail camera strategies for the summer.
A single food plot in a forested area, will have a better concentration of deer using it. This is a great way to see what deer are in the area and to get the deer to move closer to your food source. All deer are slaves to their stomachs, so if you are giving them food, cover, and low pressure it is a sure way to find hunting success.
With larger agricultural fields, you will want to focus on the edges of the field. Find a spot that has a dominant trail leading back to a bedding area. Smaller fields you will be able to put the Trail camera in the middle of the field and get the majority of the deer in the that field.
Key: Put the camera on a concentrated feeding area. We like to set our cameras facing the north so that their is no glare on our pictures.
Camera SetUp: On tree or stake. Set the Trail Camera settings to High Sensitivity and low capturing speeds.
This is perfect for creating an food plot for beginners, or experienced hunters! This food plot blend is perfect for early and late season! Perfect for getting pictures of summer bucks on your property!
2. Bedding Areas:
Putting a camera in the bedding areas are great ways to see where these deer are bedding and what deer are using those bedding areas. Doe Bedding will be close to food sources, and Buck bedding will be further back, behind the doe bedding areas. Bucks like bedding in thick cover with the wind at their back. A buck could be using the same food source every night, but be bedding in a different area. This is a great time to use the best trail camera strategies for summer.
You can analyze with the information you get from you trail cameras. Where is the deer coming from? Where is the deer going? Why is the deer at this certain camera? This will give you a good ideal why the deer are their and this could make it easier to find where they are bedding.
You can also create bedding areas by hinge cutting. This will create a perfect bedding area for Big Mature Bucks. Setting cameras along the edges of these bedding areas will help you see where they are entering and exiting.
Key: Don’t check the cameras too often here, especially close to season. You don’t want to spook any mature Bucks out of the area.
Camera Setup: You can use a camera that takes good night pictures, most deer will be coming back to these beds in the dark so that they can feel safe and comfortable before the sun rises.
This Trail Camera is perfect for bedding areas!
3. Staging Areas
If you want some really awesome pictures of Big Bucks in Velvet, in the daylight, then this is the perfect place. Thick areas that are adjacent to or within easy access to food is where you will find great staging areas. Deer are very comfortable in this area so they hangout here until last light, before moving out into the fields.
This is a good time to really get a good look of those potential Hitlist bucks, or even a good place to find that big mature Buck that you missed out on last year. Heavily warn trails leading from bedding to water or bedding to food will have some staging areas. This can be a summer trail camera gold mine if used right.
Camera SetUp: Average trigger speeds because the deer are just hanging out, they are in no hurry here. You might want to up the sensitivity if the trigger speed is low.
This is one of the best trail cameras that you can get, but also perfect for this setup and any other setups too!
4. Travel Corridors
Main trails and travel corridors between bedding and food are going to produce great opportunities during season at a giant buck, but these trails, and travel corridors also will be great places to he very good trail camera pictures. Find a good open spot that your trail camera can get good pictures of the deer and not faulty pictures of weeds. Position that camera on the trail or corridor so that the deer using them will have to go by your trail camera.
We like tp face our Trail cameras at a 45-degree angle facing down the trail or corridor so that we have the best chance at capturing high quality pictures and so that we can actually get a picture of the Bucks antlers and not just its rear.
When you have a Trail camera on a trail, you will want to check it more often until you find a trail that is being used by tons of deer. There is no point in wasting you trail camera battery on a trail that isn’t being used. Remember that the best trail camera strategies for summer is getting information and inventory on the deer herd using your land. If you can find the trail that the Mature bucks are using, then it will be a gold mine.
Tip: Worn down trails going toward water will also give great pictures all day long as deer travel in the heat to get some water.
Key: Pay close attention to the trail camera set up so that you can maximize the quality, and the number of picture you get on these trails, and corridors.
Camera SetUp: A high trigger speed camera is a necessity at this point. You will even want a camera that has a burst mode so that you can get multiple pictures of the deer incase one or two don’t turn out good. Look for trails running north so that you can face your trail camera that way for the least amount of glare.
This is an ideal camera for this specific setup!
5. Water Sources
Deer need water, just like humans. In the summer heat they need to cool down and hydrate. Little watering holes that allow the deer to drink out of could concentrate a lot of deer movement, especially if your property is scarce with water. Putting in a watering hole in a secluded area near food could be a great place for early movement. There will actually be movement in this area at all times of the day.
If there is a creek where you hunt, a really easy way to find the deer movement is to walk the creek and find where all of the crossings are, and then determine where each one is leading to. This is a great way to find bucks, and will be a great way to inventory all of the deer on the property, because ALL deer have to drink water, and if their is one water source then you can guess where they will be.
Having a watering hole is also a great strategy for holding more deer on your property. One watering hole probably will not make much of a difference on a 100 acre property, but 10 watering holes could hold way more deer than ever before. Maybe your property has great cover, woods, and food, but the neighboring property has that and a watering source. The deer will be where the water, and food is.
I highly suggest getting some watering holes put in on your property. This could change the hunting game for you and get you great trail camera pictures in the summer.
Camera SetUp: A slower capture speed is okay here because the deer will be stopped. Maybe you can focus on quality. This is a good time to hold back on your picture intervals because the deer could be their for minutes at a time.
This is the perfect camera for this set up!
6. Mineral Sites
Deer love getting extra minerals to help with their growth. Bucks really love getting more minerals that will help with their antler growth especially during summer when the majority of their antler growth is taking place.
You can train the deer to come to your mineral sites after years of use, because they were raised to go their to get great minerals. This is a great way to get consistent pictures of mature bucks. Put the mineral sight in the shade so the minerals 1. Don’t wash away from the rain. 2. The deer will have a place to get out of the sun and still get the minerals they need for growth.
Combining a mineral site with a water hole, near a main food source like a food plot or agriculture field could produce amazing results that you never thought were possible for your property. This will concentrate the deer movement and hold those deer on your property, because you just made their living conditions very ideal.
Camera SetUp: A low capture speed, and higher quality with longer intervals in-between pictures. A cheaper camera is perfect for these stationary spots.
Above is a great camera for this setup!
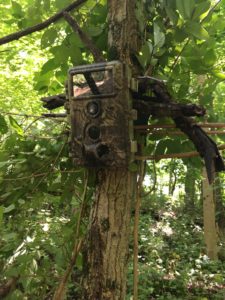
7. How to hang trail cameras and when to check them
Hang them high and out of sight and nose reach for the deer. This is a great way to pro-long a trail camera spot. Always cut a clear path to the location that the deer will be at, so that you don’t get any faulty pictures. We always bring a saw so that we can cut any branches or cut down some weeds that may be in the way.
Cover the camera up. The better you camouflage the camera the better pictures you will get of the deer, and you will not alert the deer. The biggest tip for checking the cameras is finding a good spot that has a lot of deer using that area, and then only check that camera when you hunt in that area, so that you can minimize the disturbances.
Use scent control. If you are walking to the camera in your smelly boots and touching the camera with your stinky hands then the deer could find the camera and start avoiding it. This is very important especially during season or close to it. Feathernett Outdoors always uses rubber boots that won’t hold a lot of scent to go out and check cameras. The less invasive you are in that area the more deer you will get on camera.
For More Trail Cameras Click Here!!!
Last Tips:
- Make sure the Trail Cameras Have fresh Batteries
- Make sure the memory cards in the Trail cameras have enough storage.
- Update your Trail Cameras Settings.
- Replace damaged straps for cameras. (If needed)
- Make sure that the angle of the camera is correct.
- Check the cameras frequently until you find a concentrated area that the deer are using, and leave that trail camera their for about 1-month or only check it when you hunt that location.
Closing
Now that you have read through the Best Trail Camera Strategies for Summer Deer, you will be able to apply these strategies to your hunting, and you will be able to find great success! If you would like more articles like this one, sign up for the FeatherNett Elite and get the “Get Landowners to say “Yes!” E-book.” You will also get post updates, free cheatsheets, videos, products, and more! Don’t miss your chance!
Please leave any questions, or add any comments down below!