7 Deer Hunting Tips For Beginners!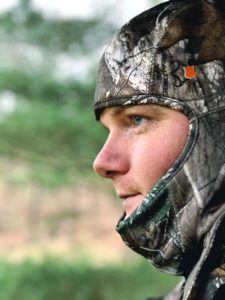
Attention Deer Hunters! No matter how many years of experience you have hunting white tailed Deer, if any, you can always learn something new! This Article is for beginners or anyone looking to refer back to the basics.
As a new Deer Hunter you will want to start preparing yourself for the upcoming season. You will want to learn what you need and the skills, information, and discipline to apply in the field.
Start on these tips right away so that you can be prepared as soon as possible and gain an advantage on the Deer! Make sure you stay discipline and patient, your opportunity will come and you will have your moment of truth. Are You ready?
- Fully Equipt Yourself
Weapon of choice
First you will need to decide on your weapon of choice and what part of the season you will be hunting. Will you Bow Hunt or Gun Hunt? Bow Hunting is the majority of the Deer Hunting Season, while Gun Hunting is only about a week.
The Length of the seasons will vary from state to state. I recommend getting a case for your weapon, for transportation.
I suggest making a budget for spending on your equipment. There is a lot of gear that you will want to have so that you are fully prepared for the hunting season. Now that you have your weapon of choice, you will want ammo & arrows.
I recommend that you buy enough to last you the full season immediately. Having some extra arrows and ammo is a good thing to have especially during the season, when you are trying to plan hunts, and chasing after target bucks.
Bows:
Bow cases:
Gun Case:
Clothing
Next you will want Clothes. This is Hats, Toboggans, face-masks, t-shirts, long sleeves, sweatshirts, jackets, coats, pants, gloves and etc. You can sign up to the FeatherNett Elite down Below and get a free Hunting Gear Checklist.
The Main thing that you should worry about with clothing in the outer layer and that you have enough total layers to stay warm. Not all of your layers have to be camo but I suggest that the outer layer is so that you’re not as visible to the deer.
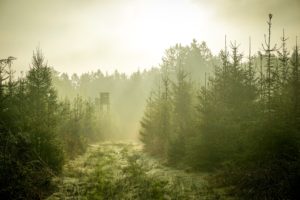
That is where this next tip comes in. You will want to think about where you will be hunting. A Tree-stand, ground blind, Stalking the deer on foot (not recommend for bow hunting)? Then you need to think about the surrounding. Is it Pine trees, regular timber, Fields, or Mountains?
You will want to buy Clothing that matches the surroundings that you are hunting in. If you are hunting from a ground blind I suggest that you wear all black because I have found that the deer do not see you as well in the blind.
Hunting Hats:
Hunting Jackets & Clothes:
Boots
Boots are definitely a requirement to hunting. You will want to base what kind of boot you want off of a couple factors. What is the terrain like where you plan on hunting? Wet? Cold? Mountains? If you are hunting in a cold wet area then you will want a boot that is water proof and one that will keep your feet warm.
If you are in a mountain area then I suggest a walking boot that has good traction and will allow you to walk long distances and up hilly terrain. You will want lighter boots in the hot parts of the season, so your feet don’t get hot and sweaty. In the cold part of the season you will want a heavy pair of boots so that you can stay warm.
Hunting Boots:
Gloves
I always wear gloves, no matter the time of season, because in the early season here in Ohio, there are a lot of bugs and mosquitos. I don’t want to feel anything crawling on my hand when I am trying to make a shot on a deer.
You should have early season gloves and late season gloves for the colder weather. I also made a purchase of a hand warmer. I will leave my hands-in this hand warmer until I see a deer, and my hands can stay warm during my whole hunt.
When it is really cold I will buy some heat up hand warmers and leave them in there so my hands stay nice and toasty. This hand warmer goes around my wait just like a belt and is very comfortable and convenient.
Hunting Gloves:
BackPack
A Backpack will play a vital role in your overall hunting experience. A Nice backpack will allow you to take more gear out into the woods with you and allows you to take more equipment so you have more tools to have a successful hunt.
I used to just Hunt with a fanny pack, and upgraded to a backback, and it has changed my whole experience. You will be able to pack more gear and clothes.
I have more storage for anything that I want to but back into my bag. My Backpack has a place that I can snap my bow onto the back of it for long hikes and it makes everything much easier. I strongly suggest you get one!
Shop More Hunting Backpacks Here
Rope
Rope can be used for a lot of different reasons. You can hang deer, so it is easier to cut the meat off of it. If you kill a deer you can tie the rope around it and drag it out.
You can use the rope to pull up a weapon if you hunt from a tree-stand. I like to tie the rope around one of the limbs on my bow and then carry the rope up and tie it off to either the tree-stand or a stable limb on the tree.
Hunting Rope:
Safety Harness
If you’re hunting from a tree-stand I ask and highly recommend that you wear a safety harness. You don’t want to fall out of your tree-stand and get injured. I know people that have fallen out of tree stands and broken bones, and I would say thats if you’re lucky.
You want to insure that you return safely to your loved ones every single time after a hunt. You don’t really need a harness hunting from a ground blind or an elevated blind, most elevated blinds have safety railing on the stairs.
Just please make sure to wear a harness. I know that it can be a hassle sometimes, but if it keeps you safe and allows you to return home after every single hunt safely then it is all worth it.
Hunting Safety Harnesses:
Shop More Hunting Safety Harnesses Here:
2. Find A Property & Get Permission to Hunt It
For most hunters, you only get two choices of where to hunt: 1. Private Land or 2. Public land.
Hunting and owning private land is a very blessed advantage in hunting. Enjoy that, and take full advantage of it.
Before diving in any further I would like to inform you of a wide spread myth. Maybe even you believe it.
MYTH= “Public land hunting is bad and no deer are around.”
Thats just not true. You see the thing about public land hunting is all about the pressure on the deer, it’s not that their aren’t deer around. They may move just at night or only move in a certain of that land.
Find where there is not pressure and you will find the deer. Now think where most hunters wouldn’t go that the deer would also be. You will probably have to take a long hike and do some scouting, but there are deer there, believe me.
Finding A Property
Finding a piece of property that holds a lot of deer can be a fairly easy task if you look at the right factors. You can look simply on google earth or you can use one of my favorite hunting apps called “onX Hunting” This app will show you the property owners name and the property lines. I think you might have to have a membership, but you do get a free 7-day trial (credit card not needed).
When looking for a good hunting property you will want to look for these factors:
- Wooded Areas (about 15+ acres)
- Crop Fields (1+ Acres)
- A water source like a creek or pond
Deer are slaves to their stomaches, so it is important that the land you are looking to hunt has FOOD!
Getting Permission
Getting permission to hunt someones land that you don’t know can be a tuff challenge to face, even though a lot of land owners can be very generous to hunters. I suggest that you start out by asking any family members or friends that has the factors above to hunt their property, as you are more likely to get permission.
If you don’t have any family or friends that you can hunt on, then use the OnX Mapping app that I linked to above and see who the landowner is and look up their phone number. I recommend going to their house in person to ask for permission, but if you’re not comfortable with that then I would just call them.
Introduce yourself and why you are calling immediately so you can get straight to the point, and don’t waste their time because they might be very busy. Offer to do work for them around the property.
If you still aren’t getting anyone to say yes then checkout this article below for more in depth information, contact me, or join FeatherNett Elite and get our “Getting LandOwners to say Yes E-book.”
Once you have your hunting weapon, gear, and property to hunt, you can then move onto step 3.
3. Becoming A Legal Hunter
Buy Your License & Tag
Yes, this is technically a pay to play sport. The sales of license and tags support Wildlife Conservation. Once you have your license and tag you now have the legal status to hunt for your desired animal (Whitetail Deer). You don’t want to get caught hunting without your tags or your license as you could be fined hundreds of dollars.
Read the rules and Regulations
After you are a legally authorized hunter, you can familiarize yourself with the rules and regulations. The rules and regulations vary from state to state so make sure to read the rules and regulations for the state(s) you hunt in.
Make sure you read them thoroughly and understand exactly what they are stating. You may have to take the hunter safety course depending on your state and age. You can read the rules and regulations and sign up for the hunter safety course at your states conservation website.
4. Scouting
Deer Sign
Now that you have your weapon, gear, property, and legal status you can move onto scouting the property for deer. I would go into that property and start walking it everywhere looking for deer sign.
You should be looking for trails, Deer Droppings, hoof prints, food sources (Acorns, Corn, Beans) and where the deer are bedding.
The lay of the land
Next you will want to looks for pinch points and funnels (Areas of terrain that force the deer to move through one specific area).
This will give you the hunter an advantage on finding the deer and positioning yourself so that the deer come within shooting range.
Once you have the food, bedding and pinch points mapped out, you can then look for trails that connect those variables above. Looking for old rubs and scrapes that deer have made in the past is a good way of knowing that deer use this area.
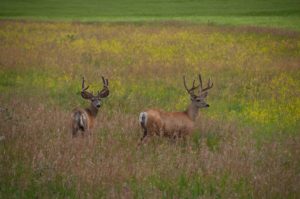
Surveillance
Once you know that deer are using that area, you can set up a trail camera to see exactly what deer are traveling the area. I normally buy some mineral blocks and put out in front of my camera. The deer will be drawn in by the attractant and the camera will get a high quality picture of the deer. I put the attractant about 10-15 yards in-front of the camera. After about 2-3 weeks go and check what is on you trail camera.
I use a sim card reader when I go out to my cameras so I can keep the simcards in and have all of the pictures downloaded right to my phone. I suggest getting 2 sim cards for every trail camera incase one is lost or damaged.
Once you get a picture of a buck then you can make a Hit list and add those deer to your hit list. You can name it or make a description of it and put down the date and time of the picture and what the conditions were like outside. I will link some attractants and trail cameras down below.
Trail Cameras:
Shop For More Trail Cameras Here
Treestand Setup
If the movement on your trail cameras are good then you should consider putting a tree-stand, or blind there. If you can hang a tree-stand in that area then I recommend setting up a tree-stand, but if this is out in a field where you cant hang a tree-stand then use a blind.
Variables of success
You should consider these variables when looking for a tree-stand location.
- Where are the deer coming from?
- What path will they most likely be coming down?
You will want the stand about 15-25 yards off of the main trail, and you will want to hang the stand on the back side of the tree from the direction the deer are coming from.
You don’t want the path to be directly behind you because you wont see the deer coming, but you will want to be parallel with the path. This will give you the most cover and offer you the best shot.
Next you will want to consider these two factors:
– Does the stand have easy access?
- What is the ideal wind direction to hunt this stand?
You want easy access to your stand so that you can get In and out without bumping deer out of the area. You should clear out a path so you can quietly access the stand or blind. Avoid walking near bedding areas and food sources.
Next you need to decide the wind direction to hunt this stand. You want your wind blowing away from where the deer will be traveling or will be feeding, and bedding. Access the stand the same way.
You don’t want your scent blowing to the deer or where they will be. Being able to get into the stand silently and undetected while having your wind blowing your scent in a direction the deer wont be traveling is a real skill and one that will take you a long way in hunting.
Climber Stands:
Treestands:
5. Learn Your Weapon
First you should familiarize yourself with the functions of the weapon, know how it works and the function of each part of the weapon. Educate yourself about your weapon.
Sighting In your weapon
Now you can focus on sighting in your weapon. I will link to a video that will show you the best way to sight in your weapon (Gun or Bow).
It is very important that you practice a lot with your weapon, so when the moment of truth comes, you can take and put an ethical shot on the deer. When practicing put yourself in real life situations, so when you are out hunting, no matter what happens you are prepared for it.
Practice will give you tons of confidence going into the season, which will help you when the moment comes, when the deer is standing broadside at 20-yards.
https://www.youtube.com/watch?v=3L2EJ_tZkDY
6. Plan Your Hunts Accordingly
Once you are ready and have reached this step, then it is time to plan your hunt.
Less Is More
You might only have the weekend to hunt, so it is important to not force any hunts. Sometimes Less is More and that applies in hunting. If the conditions are not in your advantage, like the wrong wind direction, its windy, rainy, too hot then you should probably stay home and study more on when to strike. The first hunt in your stand will probably be the best hunt in that stand.
The deer will catch on to you if you aren’t careful and they will avoid that stand. You want ideal conditions that will give you the advantage. You want about a 12degree + drop in temperature, after a harsh cold front storm.
Storms that have high winds and rain that will make the deer bed down and force them to skip a meal, will result in great deer movement after the storm/cold front passes.
Remember that deer are slaves to their stomachs so be In your stand and ready to go when that storm starts to pass or lighten up. Here I will link to the new app that is coming out and will tell you when to go hunting. It doesn’t release until August 28th 2018.
Rut Ready
During the rut you will need to be in your stand every chance you get. The deer are up moving and expanding their home range (traveling more). New deer will be popping up on your trail camera and when the rut starts you will want to spend as much time in your stand as possible.
That means planning some all day hunts, so don’t forget to pack extra clothes and a sandwich. Deer will be moving at odd hours of the day, like 12-2p.m. Check your cameras more frequently so you can tell when a mature buck is on your property. GO HUNTING IMMEDIATELY!
Another good strategy is to move closer to the bedding areas because bucks will be searching for the first doe in estrus so he can breed her. This is a great opportunity to take a big mature buck.
The Rut will happen at the same time every year on your property. The time will vary depending on which state you’re in. The Mid-West Pre-Rut is about October 22nd- November 3rd. The Main Rut is about November 4th- November 11th. Post-Rut is around November 12th- November 20th. This is when you schedule time off work and sit in your stand as much as possible.
Make Sure to Claim your spot on the FeatherNett Elite Team to earn discounts for hunting products, get cheatsheets, Updates, and Free E-books.
7. The Moment Of Truth
Now that you have followed the steps leading up this, it is all up to you now. Did you follow the full progression and stay committed & Discipline? Are you going to be ready when that deer is in-front of you or are you going to freeze up and blow the opportunity? Are you educated, confident, and consistent enough to make it all happen even if its one chance?
Look back on your practice and all of the hard work and dedication you have putting this year. Make it all count. Focus on the kill zone and get in position. Get your bow up, make any adjustments and slowly squeeze the trigger.
The Drum Roll
After the Shot, try and watch how the deer reacts, and where it runs to. Take note of the last place you saw the deer. I use lighted nocks so I can see a general area of where I hit the deer.
I like to wait 15-30 minutes before I get down to see what the blood looks like. After I look at the start of the blood trail and determine if it was a good hit or not then I will either back out or track about 50 more yards to see what the blood is like.
If the blood further down the trail isn’t like I hoped, then I will back out and go home, review the footage, and then decide when to further track the deer.
If there is blood everywhere then I will take on the track immediately, but if there isn’t much then I will back out immediately.
The Hit
Heart shot-The deer will rarely run out of your sight before crashing. The deer will do a “mule kick” and the arrow will be covered in lighter-red blood. You can track almost immediately. I suggest a 20-minute wait.
Lung Shot-The deer will run about 150-yards before dropping if that. The blood will be a pinkish red color and should be spraying everywhere. You should give the deer about 30-minutes— An Hour
Liver Shot-Deer will slowly walk away and the blood will be a dark red color. The blood will be in drops. I suggest waiting 5 hours before further tracking.
Gut Shot-Deer will arch their back and walk away slowly. The blood will be a greenish brown matter and have a very unpleasant odor. I suggest waiting 10hrs to recover the deer or if you cant wait that long, go in at about 5 hours and be ready to put another arrow in the deer because it will probably be bedded down, and still alive.
It all paid off
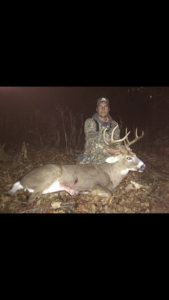
Once you find the deer you can celebrate, because all of your hard work, discipline, and dedication paid off. You are now a successful hunter. If you don’t find the deer, don’t kick yourself too much, its apart of the sport, and thats why its called hunting not killing.
Be grateful for the meat and all of the food it can supply. Don’t just kill for sport, and waste all of the valuable meat. If you tried to look for the deer and dint find it, then thats different, but if you shot it and it ran out of sight and you didn’t even try to look for it then you shouldn’t be hunting.
Know that all of your time and efforts have paid off. Take it in and get ready for the next hunt or the next season.
Deer Carrier:
Thank you for reading this article and I hope it guides you to a successful hunting season. I hope that you learned a lot and I hope that you take massive action on the information provided for you. If you would like more articles like this one, and to get updates on articles and new posts, free cheatsheets, E-books, and discounts on products, then you should Join the FeatherNett Elite. Join Below!!!